Categories
Average Joe's Tips

How To: Check Your Computers Log In Times

Checking your login times are very helpful in many way. For example, if you feel like someone maybe a friend or family member has been snooping around on your computer, you can check to see if someone logged in and at what time it occurred. Another way this is helpful is if you want to see how often you use your computer. To do this just go and open Console. To open your Console application go into your Application folder, then into your Utilities Folder. After that is open, you will see your activity on your computer and type in “wake” to see logins. On the very left you will be able to see the time to check and see when someone logged in. By looking at the time you will be able to compare and see if you remember logging in at the time or not before blaming someone for snooping around on your computer.

Thanks to : OSXdaily.com for this great tip!


Stay connected at my new twitter handle to stay updated 24/7 @TRMGaveragejoes and @realmacgenius What do youthink? Let us know in the comment section.

Categories
Average Joe's Tips Uncategorized

Customizing Your Mac’s Trackpad

Tapping the track pad in order to click has become a very popular way for selecting application or texts when using a Macintosh. Its popularity comes from the convinces factor of not having to press down completely on the trackpad every time. However, tap to click tends to be annoying for new users, who may find themselves selecting texts or applications when not desired. Other than tap to click, the trackpad has many other potential capabilities like secondary click, zooming, rotating, and a multitude of gestures. To find these trackpad customizations locate your System Preferences application, then open the Trackpad pane under Hardware. From there you are free to explore. Bellow is a quick overview of my most commonly used trackpad click and hand gestures.

Tap to Click

As described above, tap to click gives the user the connivence of being able to tap their trackpad (instead of pressing down to select) in order to select text or apps.

Secondary Click

This allows the user the ability to secondary click (a.k.a. right click), instead of pressing control + click.

Zoom and Rotate

Found in the Scroll & Zoom section, zoom and rotate is a quick way to zoom into or rotate photos in selected applications like iPhoto.

Swipe Between Apps

In my opinion this is the best gesture ever created. Although it is simple this gesture enables you to four finger swipe between your desktop screens.

Categories
Average Joe's Tips

How To: Password Protect Your Files

Thanks to Apple and Mountain Lion, password protecting your folders is easier then ever. This is ideal for things that you want kept unseen or safe incase your computer is stolen. The process starts by first opening Disk Utility under Utilities in the application folder. After that go to File -> New -> Disk Image From Folder…


Once that is open, select the file you would like protected. Fill in the Save As and Where information, then for Image Format select: read/ write and for Encryption select: 128-bit and press save.


Let it load and enter in your desired password. After, go to the Remember Password in My Keychain check box. Note that if the boxed is click it will automatically open the folder without the need of a password, but if its unchecked you will need to enter the password in every time you want to access the folder on your desktop.


After that look in the area where you saved your file and your password protected folder will apear as a .dmg, next you will need to click on it and enter your password to access the drive. From there you can just click on the drive, and your files from the folder will apear. The picture shows the three files you should end up with.

Stay connected at my twitter handle to stay updated 24/7 @TRMGaveragejoes and @realmacgenius What do you think? Let us know in the comment section.

Categories
Average Joe's Tips

The Basics and More: Text Edit

Basics of How to Use

Text Edit in words is a very simple version of Microsoft’s Word. Text Edit is very self-explanatory application. It will allow you to change fonts, sizes, bold, colors of words, and much more. Some of the fallbacks of Text Edit is that it does not have the special features that Word has like making charts, or creating special documents.

Useful Things

Like I have said, Text Edit is a very simple application, but it also has some very useful features like Spelling and Grammar Check. Another thing that is very useful is that you can save the file as a PDF. Moreover, if you have any questions on how to use this application you can go to the Top Menu Bar, select Help and type in your problem.

Conclusion

Clearly, Text Edit is a very simple Application that is very useful if you don’t want to pay for Word. Text Edit is a great application for people who don’t need anything fancy and just want to get down to writing.


Stay connected at my new twitter handle to stay updated 24/7 @TRMGaveragejoes and @realmacgenius What do you think? Let us know in the comment section.


Categories
Uncategorized

One Mac to Rule Them All

As a network technician, I found myself in a unique position when it came to my Mac. How far could I take the task of administering my LAN’s user profiles and machines using my MacBook Pro? Turns out it is possible.

My Mac is on the same network as all the Dells on campus. It’s my job to remotely unlock user accounts, add new computers to the network, and manage the files on the four servers. Here’s what I’ve found:

1. Use OS X 10.6 Snow Leopard

I know there are still those out there who love Tiger. Trust me, I’m one of them. But the fact of the matter is that Apple didn’t really incorporate the tools necessary for working on PC networks until OS X 10.5 Leopard. Snow Leopard improved upon those tools, such as notifying me when my network password is about to expire. In general, Snow Leopard is more stable.
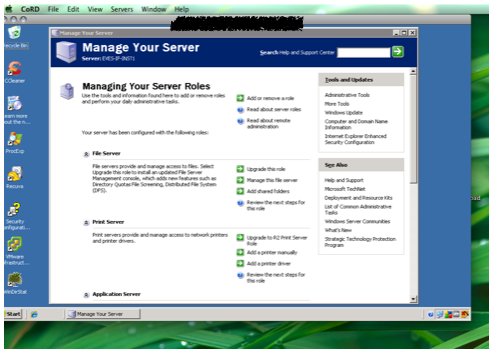
2. Download CoRD

CoRD is a free download that will let you open Windows servers on your Mac. What’s great about this program is that it will open the server up in a window on your desktop. No restarting or logging off, or anything like that. Move your mouse around the server window, and you’re controlling the server’s interface. From here, you can easily get in to Active Directory to manage user accounts, or access any of the other tools on the server.


3. Use command+k to access the server folders

Browsing through folders on the server is no problem at all, though you may not see them initially. Open Finder and select Go > Connect to Server (command+k). From there, type in smb://YourServerName.YourDomainName

You’ll need to authenticate with your credentials, but after that you’re good to go.

If there are other Macs on the network, make sure to log on to them as an administrator. In Sharing under System Preferences, make sure to select Remote Management. That way you’ll be able to share the screens of the client Macs after authenticating. It’s not Apple Remote Desktop, but it can at least show you what’s going on with the user.

With the dawning of the Age of Intel, Macs have become better and better with working along side PCs. Being an administrator with a MacBook Pro hasn’t hindered me a bit.

If anything, I have to remind myself that Expose is not an option for me when I do use a PC. Can’t tell you how many times I’ve jammed the cursor into the corner, expecting something to happen.

[Image Source]