Categories
Average Joe's Tips

Tips to Take Advantage Of: iCal

Invite Friends to Events

  • Sending event notifications to friends is as simple as typing in their email. When making a new calendar event simply type your friend or families email into the Invitees section (located under Alert) and it will send them an email containing the event information. Your friend can choose wether to accept or decline. If your friend or family accepts it will show a check mark next to the name.

Quickly Create an Event

  • To create an event quickly just click the “+” button or “command” + “n.” When creating an event keep in mind iCals new smart feature where it can tell what time to set an even if you put in phrases like “on Saturday at 7am until 10am.” This helps to create less havoc when creating many events, so that you do not have to go through the monotonus work of adding times, dates, alerts, and many other things.

Heat Map

  • The heat map is a cool new feature that when in the Yearly calendar viewing mode you can see the days when you have the most things going on. The heat map is a helpful visual for what is coming ahead in the year.


Add Accounts

  • I had done this tip previously about a year ago, but I feel that this tip is important enough that it can be restated. Todo this go into iCal Preferences. Then go to the Accounts section and select the “+” button on the left side. Then to add an account fill in the information. For example, my account type is Google, then I fill in my Google email, and password because that is the account I want to sync. This account sync will also work with Yahoo and iCloud. Something to note is that if you are trying to sync your Google calendar with iCal then under the Google account you will need to go into delegations, then select the calendar categories you would like to add. Also, when creating a new event to sync this with the account, goto the section that says Calender on

Set Full Screen

  • Setting full-screen mode is very simple. Just like any other application goto the top right of iCal and click the expand buttons. To get out of full-screen mode just goto the top menu bar and click the retracting arrows.
Categories
Average Joe's Tips

How To: Password Protect Your Files

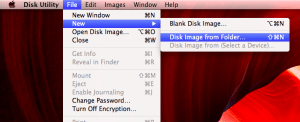
Thanks to Apple and Mountain Lion, password protecting your folders is easier then ever. This is ideal for things that you want kept unseen or safe incase your computer is stolen. The process starts by first opening Disk Utility under Utilities in the application folder. After that go to File -> New -> Disk Image From Folder…


Once that is open, select the file you would like protected. Fill in the Save As and Where information, then for Image Format select: read/ write and for Encryption select: 128-bit and press save.


Let it load and enter in your desired password. After, go to the Remember Password in My Keychain check box. Note that if the boxed is click it will automatically open the folder without the need of a password, but if its unchecked you will need to enter the password in every time you want to access the folder on your desktop.


After that look in the area where you saved your file and your password protected folder will apear as a .dmg, next you will need to click on it and enter your password to access the drive. From there you can just click on the drive, and your files from the folder will apear. The picture shows the three files you should end up with.

Stay connected at my twitter handle to stay updated 24/7 @TRMGaveragejoes and @realmacgenius What do you think? Let us know in the comment section.

Categories
Average Joe's Tips

Mountain Lion’s New Notification Center

A great new feature that comes with Mountain Lion is the Notification Center. I know this may seem just like every other application Apple adds to a new OSX, but even so this application can keep you turning in your papers on time. First of all, there are three ways to access the Notification Center. The first way to do this is simply by going to the top right of your computer and clicking on the three sideways bars. The second way is with a gesture, the gesture is a two finger swipe from the right edge of your trackpad to the center. The last way to open your Notification Center, for those of you not using a trackpad, is by  using a keyboard shortcut. To activate this go into System Preferences, then click on the Keyboard pane, from there goto the Keyboard Shortcuts tab, and under Mission Control select Show Notification Center. The Key next to Show Notification Center is the keyboard shortcut. And for when you are feeling lazy, to pause all of your notifications scroll down when in the Notification Center and flip the switch to Off. One of my favorite things to use the Notification Center for is Tweeting. To set this up simply goto Twitter on Safari and after you sign in, it will ask if you want to allow access of your account to other applications. Once this is setup go into the Notification Center and a Twitter button will apear. Finally, the decision of what applications need to be notifying you. Start in the Notification Center and scroll down to the bottom right and select the gears icon. From there you can choose from a multitude of applications allowing them to notify you with a banner or alert or nothing at all. Thanks to Apple, I can be as productive as possible. Well at least for now.

Stay connected at my twitter handle to stay updated 24/7 @TRMGaveragejoes and @realmacgenius What do you think? Let us know in the comment section.

Categories
Average Joe's Tips

How To: Use GarageBand’s “Learn to Play”

Apple has made it easier then ever to learn how to play an instrument at home. Through GarageBand you are able to learn the fundamentals of how to play a basic, rock or even a blues guitar. Did I mention that those lessons are free. You can even learn along side one of your favorite artists, but this one will end up costing you about $5 for every lesson (lessons go from Beginner to Advanced). All of this should be located in GarageBand’s Lesson Store.

“Intro to Guitar” should already be pre-installed into GarageBand. To start the video just click on it and a full screen demo should appear. On the timeline (located under the video) you are able to control which sections you would like to go over. On the top right of the full screen demo are a Glossary (for music terms), a Tuner (if you have your guitar plugged into your computer), a Mixer (for volumes of teacher’s voice, guitar, ect…), and Setup (for music notations or how you would like to view your music notes while in Play mode). When you feel ready to take a take on the song that you have been practicing in the video, hover over the video screen and click Play. In Play mode you are also able to pause, repeat, and slow down parts of the song to make it easier to learn. After a little practice you can record yourself and listen to what you sound like by hitting the circular Record button on the bottom middle. In no time you will be a rock legend!

Stay connected at my new twitter handle to stay updated 24/7 @TRMGaveragejoes and @realmacgenius What do you think? Let us know in the comment section.

Categories
Average Joe's Tips

Apple’s “Find Out How” Videos

For those of you who do not like to read, I will keep this short and say that Apple has many “Find Out How” videos, so that you can fully learn how to master your computer. For the link to the website click here or you can find it by typing in “Find Out How” in the search bar in Apple’s website. Now, for those of you who do not mind reading I will go on further to explain the many depths of Apple’s “Find Out How.” To start, Apple has conveniently listed a few categories to choose from. It starts with Mac Basics, Photos, Movies, Web, Music, and ends with iWork. Under each category is a subcategory, containing a list of all the videos. After, you have watched a video the site will automatically check mark the name of the video so that you know which you have already watched. For, those of you who took the time to read this all the way through, I hope this helps and you learn how to master your Mac.

Stay connected at my new twitter handle to stay updated 24/7 @TRMGaveragejoes and @realmacgenius What do youthink? Let us know in the comment section.