To start the week of Apple’s WWDC 2011, we thought we would kick it off with some humor. The video above is of Bertrand Serlet showing ‘similarities’ between Mac OS X and Windows Vista.
Categories
 The Real Mac Genius
To start the week of Apple’s WWDC 2011, we thought we would kick it off with some humor. The video above is of Bertrand Serlet showing ‘similarities’ between Mac OS X and Windows Vista.
The great thing about Pages is how it’s both a word processor and so much more than a word processor at the same time. For example, the Shapes menu gives you access to a selection of shapes to be dropped right into your document. Using the Inspector tool, you can customize the shape’s color, border, orientation, and even add a drop shadow.
But it gets even better than that! With some creativity imbued along with the tools available, you can actually make some pretty neat works of art. Said works of art could even be submitted to online contests, such as the one we’re hosting right now.
Here’s the deal: the tutorial below will help you draw your masterpiece with Pages. Take a screenshot and then send it in!
I’ll walk you through the basic steps for making fanciful designs. Have you ever seen user-submitted Mii’s for the Wii? I often scratch my head, wondering “How did they do that with the few things they’re given?” You need to adopt the same mentality with Pages. Push it as far as you can take it. Use punctuation for facial features, incorporate text, use borders as part of your subject.
1. Build a “Gumby” foundation
For whatever reason, when you drop a new shape into Pages, it appears in “Gumby” lime green. You can always change the colors later, but for the foundation, I recommend focusing more on the design you’re trying to achieve. Here’s the start of a self-portrait using just the shapes to “build.”


When thinking of something to draw, try imagining it as the different shapes Pages offers. Try rotating the shapes to fit your needs. This can be done with the Inspector tool. You’ll become real familiar with this guy. Click on the blue “i” in the menu (or option-command-i) and then select the Metrics tool (ruler icon). Click on the rotate dial and turn the shape until it’s where you need it.
Also, when placing shapes, you can always right click on overlapping shapes to either send them back or bring them forward (think of pieces of paper physically layered on top of each other. How would you want them to be layered?).
2. Outlining
Once you have all the pieces in place, go through and determine how the outlines of the shapes will play into your drawing. Do you want the shapes to stand out, or would you rather they meld together? Since I have multiple shapes in play for different parts of my face, I removed the lines. In the Graphic Inspector (square and circle icon) you can change the line settings or remove it all together.

Notice that I left the eyes outlined so that I could actually find them in the sea of green.
3. Coloring
Here’s where the fun begins. Now you can start to give your drawing some life by replacing the lime green with colors. Again, using the Graphic Inspector, you have a variety of options with Fill. Play around with the different options until you find what will work best. You can even change the colors of the shape’s borders to blend them.

4. Add details
Here’s where you add the finishing touches. The pen tool in the Shapes menu can help add those fine lines. Drop shadow can be used to add a dramatic effect. I have a fever, and the only cure is more drop shadow!

5. Finish it up
I added a white box with no border at the bottom of my picture to even out the arms and torso. I then placed a larger “frame” box around my picture and sent it to the back. Finally, I used a line shape to bridge the area covered by the white box. By using the jagged border, it kind of blends them together. Then I finished with a gradient I liked.

6. Take the screenshot
If you don’t know about shift-command-4 then you’re missing out on a wonderful tool. Hitting this key combination will turn your pointer into a crosshair. Click and drag it over the area you’d like to capture, and it will instantly take a screenshot and save it on the desktop as a .png file. You can rename the file and also turn it into a .jpg extension if you need to. Not happy with the area you selected? Hit Esc before letting go of the mouse and the crosshair goes away. Watch out that you don’t capture your Pages cursor in the shot.
Here’s how to enter…
We at The Real Mac Genius want to see how far can YOU take drawing with Pages? The contest is simple: “draw” anything you’d like using just the shapes in Pages. Draw your favorite Apple product, a self-portrait, or even your favorite Smurf! Take a screenshot, and e-mail it to me at: [email protected], with “PAGES CONTEST” in the subject line. Please note: NO clip art or photos can be incorporated into the drawing. Basically, don’t bring anything into Pages. This will help keep the drawing focused on what Pages can do.
So, what’s it all about, Alfie? Well, we have two cool prizes to give away, thanks to Targus.
1st place: Targus Truss Case & Stand for iPad 1 & 2
2nd place: Prize detail to come shortly.
Rules
You must be 18+ years of age and reside within the 48 contiguous United States. One entry per person. Final entries due by Saturday, May 28 at 11:59 PM EST. No entries received after this time will be considered. Winners will be selected based on creativity, design, and adherence to the rule of not importing any clip art or photographs. Winners will be notified by June 1st. Good luck!
 Anybody who thinks flash drives can’t be fun should think again. I was recently introduced into a whole new world of flash drives created by a company called Mimoco. This Boston based company is renowned for their collectible line of designer USB flash drives called Mimobots.
Their elite collection includes collaborations with crossover artists and major licensed brands, bringing USB drives that look great to their consumers. A few of their existing licenses include DC Comics, Star Wars and Sanrio, the maker behind Hello Kitty®. What really stands out for the Mimobot drives isn’t really the speed of the drives, but rather the true uniqueness behind each and every one of the products released.
Mimobots bring a sense of style into the electronic world– bridging the gap between technology and art. Offered at 2, 4, 8, and 16gb of storage space, pricing for Mimobots begins at $19.99 for the lowest capacity, but increases with the size. Although Mimobots are not the cheapest option on the market, their head-turning appeal more than makes up for the price difference. Mimobots are not only stylish but also useful–we all need a flash drive, so why not sport one that reflects your individuality! I would recommend Mimobots to anyone and everyone.. piper quinn nude Yasin Avc footballer born 1984

As a network technician, I found myself in a unique position when it came to my Mac. How far could I take the task of administering my LAN’s user profiles and machines using my MacBook Pro? Turns out it is possible.
My Mac is on the same network as all the Dells on campus. It’s my job to remotely unlock user accounts, add new computers to the network, and manage the files on the four servers. Here’s what I’ve found:
1. Use OS X 10.6 Snow Leopard
I know there are still those out there who love Tiger. Trust me, I’m one of them. But the fact of the matter is that Apple didn’t really incorporate the tools necessary for working on PC networks until OS X 10.5 Leopard. Snow Leopard improved upon those tools, such as notifying me when my network password is about to expire. In general, Snow Leopard is more stable.
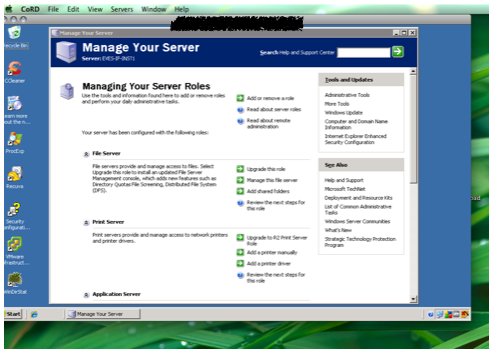
2. Download CoRD
CoRD is a free download that will let you open Windows servers on your Mac. What’s great about this program is that it will open the server up in a window on your desktop. No restarting or logging off, or anything like that. Move your mouse around the server window, and you’re controlling the server’s interface. From here, you can easily get in to Active Directory to manage user accounts, or access any of the other tools on the server.

3. Use command+k to access the server folders
Browsing through folders on the server is no problem at all, though you may not see them initially. Open Finder and select Go > Connect to Server (command+k). From there, type in smb://YourServerName.YourDomainName
You’ll need to authenticate with your credentials, but after that you’re good to go.
If there are other Macs on the network, make sure to log on to them as an administrator. In Sharing under System Preferences, make sure to select Remote Management. That way you’ll be able to share the screens of the client Macs after authenticating. It’s not Apple Remote Desktop, but it can at least show you what’s going on with the user.
With the dawning of the Age of Intel, Macs have become better and better with working along side PCs. Being an administrator with a MacBook Pro hasn’t hindered me a bit.
If anything, I have to remind myself that Expose is not an option for me when I do use a PC. Can’t tell you how many times I’ve jammed the cursor into the corner, expecting something to happen.

There are times when Apple releases a new feature, and you think, “Wow, this is really cool!” Then there are other times when you think, “This looks cool, but how the heck would I use it?” Spaces, first introduced in OS X 10.5 Leopard, felt more like the latter. Grouping applications to virtual desktops looked promising, but its usefulness felt questionable. Stickies has been around since OS 7, but even that one didn’t feel too purposeful. karleystokes lana rhoades onlyfans Karley Stokes All the notes just litter the desktop until the app is closed or you right click on the icon in the dock to hide. Creating the notes with the Stickies widget in Dashboard isn’t much better. But combining Stickies and Spaces leads to something different. Open System Preferences and click on Expose & Spaces. Select the Spaces tab and then check “Enable Spaces.” After you select the “+” symbol, select Stickies and assign it to Space 1. Done. But from there, you can customize Spaces further, adding or taking Spaces away or adding other apps in to the mix. Hit F8, the Spaces icon, or Expose, and bam! Stickies. Done looking at them? Just go back to your first space. From there you can add the functionality of the way Stickies works with any highlighted text by clicking and dragging it on to the Stickies dock icon (in Safari, Command-Shift-y eliminates the need for click and drag). Color-coding is as simple as selecting Color from the menu, text can be put in bold to show importance, or images can be added. The features of OS X never cease to amaze. Apple has spent so much attention to user friendliness with intuitive functionality that applications can work together to create a greater effect. Now, if I could only wrap my head around how to use Automator. I guess I’ll make a note to look into that.[Image Source]