The concept of MobileMe is great, for $99 a year, Apple provides as service of: email, calendar, contact, tracking, photo, and online cloud storage syncing. All of these features can be accessed from any of the Apple iDevices that you may have, and computers regardless of the OS (Operating System). Additionally, Apple provides the services accessible through their web service at: me.com. Pretty neat, right? The only predicament, why do I need to pay $99 dollars for these services, can’t I access these for free using something else? sydney sweeney sextape After a day of searching through the Internet, I discovered that I could with the features of Google. Now that I have expressed by grief, let’s get started on how we can access these services free through Google with a little help from Apple. I will only be covering the syncing features of: email, calendar, contacts, and the tracking service. However, if you want to sync photos, use Picasa. Picasa is straightforward and intuitive to setup. We will be using Google Sync, a service that is provided free to all Gmail and Google Apps users (like The Real Mac Genius.com Note: Google Apps Administrators must enable Google Sync). Google Sync synchronizes your email, calendar and contacts. To cover the tracking of your iDevices, we will use the kind help of Apple since they have enabled Find My iPhone/iPad for free — thanks Apple! You might wonder, why is an Apple enthusiast blog advocating the use of Google instead of Apple’s service of MobileMe. Well the answers quite simple, “Why should users (Apple or not) need to pay for these services that are free.” Also, MobileMe is “OK”, so why don’t we just use services that are currently better. Overall, being raised from frugal parents, the best option is free. Enough with the introduction, let’s start syncing.Prerequisites:
– 20 Minutes of your time
– iOS 4.2 running on your iDevice
– Mac OS X 10.6
– Gmail account or Google Apps (with Google Sync enabled) with IMAP enabled from the Settings
– Apple ID (Apple IDs are created if you have ordered on the iTunes Store or Apple Online)
– Backup of your: email, calendar, contacts — if something were to go wrong
Most access Gmail through the web interface, but if you like to use the native applications of Mail, let’s quickly go through how to enable the syncing of your contacts and calendar in Address Book and iCal.
Gmail will be used instead of writing Gmail and Google Apps.
Note: The Real Mac Genius.com is not responsible for any loss of data. It is your responsibility to backup your data.
Contacts
 If Address Book is not open, go ahead and fire it up. Then on the top menu bar, click “Address Book” then “Preferences…” (Command + ,). Click on the “Accounts” tab and check “Synchronize with Google”. Enter your credentials for your Gmail account.
Leave Address Book running, your contacts will be coming in shortly.
Calendar
Launch iCal, if iCal is not already loaded. Like what we did in Address Book, navigate to the preferences of iCal. On the top of the menu bar find “iCal”, then “Preferences…” (Command + ,). Navigate to the “Accounts” tab, then click the plus at the bottom left to add your Gmail account.
In the “Add an Account” box that has opened, change the account type from “Automatic” to “Google”. Then, enter your Gmail credentials, and click “create” when done.
Leave iCal running, your calendar will be coming in shortly.
Note: iCal, by default only shows one calendar. To enable more, go back to the “Accounts” tab in iCal Preferences (“iCal”, then “Preferences…” ). Select your account, then click on the “Delegation” tab and check the “Accounts I can access:”, your calendars should populate the screen shortly.
Find my iPhone/iPad
Note: Setup is similar for iPad and iPod touch, the screenshots shown are of an iPhone.
 On your iDevice, tap the Settings icon and chose Mail, Contacts, Calendars. Then the Add Account button and select MobileMe. Enter your Apple ID and password and press Next.
You will need to verify your Account. So navigate to the email of the Apple ID and verify. Click the Verify Now on the email sent by Apple. 
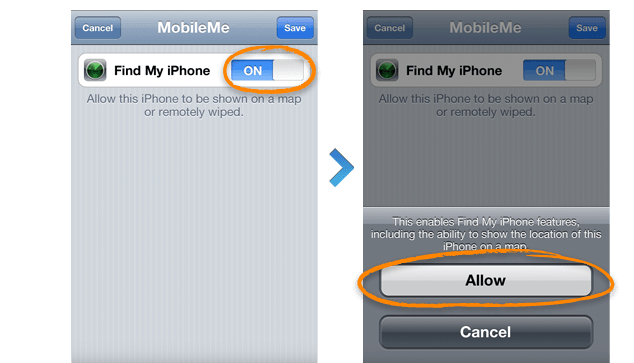
 Go back to the Mail, Contacts, Calendar screen and select the MobileMe account. Then turn the Find My iPhone on, and tap allow at the prompt.
You can test Find My iPhone by logging into me.com.
Syncing on your iDevice
We will now add your Gmail account to your device. Tap Settings on the homescreen and select Mail, Contacts, Calendars. Then Tap Add Account… and select Microsoft 

 Exchange.
Leave the Domain field blank. For the Username, enter your full Gmail address, then enter the password in the Password field and press Next. If Unable to Verify Certificate appears, tap Cancel.
When the Server field appears, enter: m.google.com and tap Next. Select the services you want to sync (Mail, Calendar, and Contacts).
Unless you wish to delete the existing Contacts and Calendars on the phone, select Keep on My iPhone. 
Your device will start to populate with your contacts and calendar.
Success!




![[Image Source]](http://images.apple.com/mac/app-store/images/apps_gallery_featured_20110107.jpg)